As one of the foremost fashionable video streaming platforms on-line, if you would like to possess your vlog, comedy sketch or music video seen by somebody, obtaining it on YouTube could be a should. however if you’re new the streaming scene, you’ll be inquisitive the way to transfer a video to YouTube.
Note: For the aim of this guide we’ll assume that you’ve already created your YouTube/Google account. whereas those ranging from scratch can have to do thus, there are several parts concerned in its setup and customization that are additional subjective and aren’t coated by the scope of a guide like this.
Step 1: Sign into your account
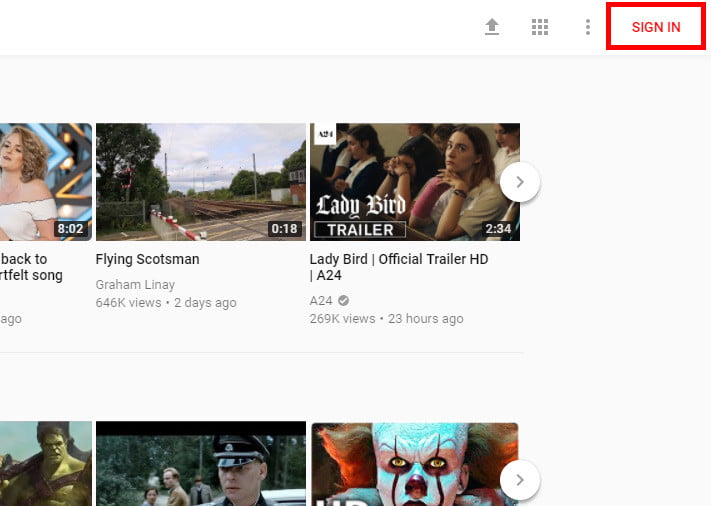
You can’t okay transfer a video to your account if you aren’t signed in thereto, currently will you?
Head to the YouTube homepage and click on the sign-in link within the high right-hand corner. If you have got multiple accounts related to the device you’re victimization you’ll be prompted to decide on the acceptable one. Once done thus, enter your secret and you’ll be taken back to the most YouTube page.
Things could look a touch completely different in terms of video recommendations, however don’t fret, you’re currently well on your thanks to uploading your initial video.

The next step is even shorter than the primary. Click the transfer button. It’s conjointly settled within the high right-hand corner ANd is painted by an up arrow with a line beneath it. which will take you thru to a fanatical transfer page, wherever you’ll opt for where you supply your approaching infectious agent sensation from.
Step 3: Choose video source and privacy settings
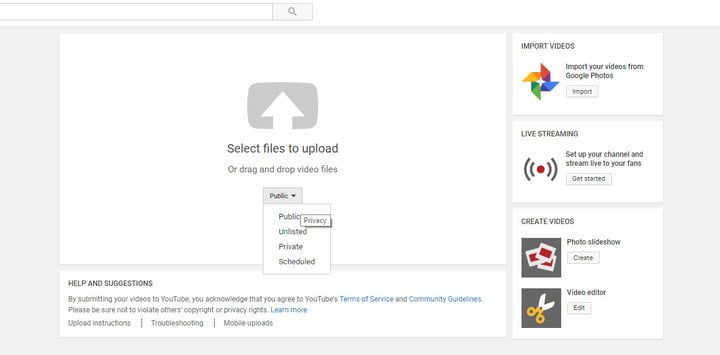
The transfer page provides you some completely different choices to choose from and they’re all price considering. For starters, you would like to make your mind up WHO you would like to work out your video, and alter the privacy settings consequently. If you would like anyone and everybody to work out it, selecting the “public” setting within the central drop-down is that the thanks to go. If you would like a touch additional management over WHO sees it, choosing “unlisted” keeps it from being findable through searches. Instead, folks would wish to click the direct link or visit your channel.
If you’re simply trying to stay the video in private for yourself, or to store one thing for later unveiling, prefer to build your video “private” instead. “Scheduled,” permits you to opt for a future time and date for a video to become public.
Once you’ve created your call concerning WHO will see your video, you would like to pick wherever you’re uploading it from. does one need to import it directly from Google Photos (It’s higher than iCloud you know)? transfer it straight from your device’s storage, or live stream it instead?
There are specific choices on the right-hand facet for live-streaming and commercialism, however most are doing thus from their native device. For that, click the massive white arrow with a grey backcloth within the center of the screen and choose the video you would like to transfer from your varied files and folders.
Step 4: Managing the upload

Get ready, as a result of once you’ve confirmed the video you’re transfering you’ll be whisked away to the upload page. it’s begun, and you’ll see a progress bar at the highest of the screen, material possession you recognize what proportion of it’s uploaded, and the way long till it’s completed.
Depending on the length and quality of your video, that will take a while. whereas YouTube works its magic thereon, you’ll begin obtaining it prepared for time. There’s a title to place in, an outline, and any relevant tags you are feeling it must facilitate the overall public notice it. There’s conjointly a button wherever you’ll add it to a play list if you so want.
For those desirous to go a touch additional in-depth with their video transfer, the “Translations” tab permits you to input translated title and descriptions for YouTubers round the world. “Advanced settings” permits you to management varied aspects like the class, whether or not you permit comments and ratings, whether or not the video is 3D, and if you would like community contributions or not.
Those are all fascinating aspects of uploading videos to YouTube, and may facilitate build your videos additional comprehensive and relevant to your audience, however they aren’t a necessity for merely obtaining a video on-line.
Step 5: Pick a thumbnail
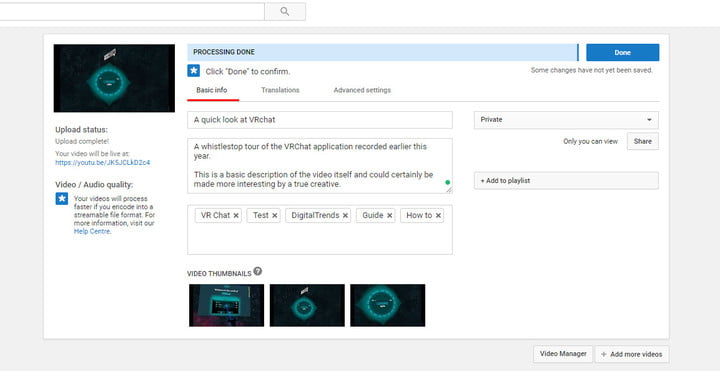
Unless you have got a verified account, you can’t get too artistic with thumbnails, however that doesn’t mean you don’t have some alternative. Once your video is totally uploaded and processed, you’ll have a alternative of 3 thumbnails from the video to pick from.
Choose your favorite and click on the blue “done” or “publish” button to end. If you would like to in private share the video, you’ll click the “share” button on the correct instead.
Step 6: Video management

From now on your video is on YouTube and is publically out there, or not, reckoning on your preferences. If you would like to form any changes thereto within the future tho’, all you would like do is head to the “Creator Studio.”
You’ll notice a link for it within the sink after you click on your account portrait in the high right-hand corner.
From there you’ll be able to see your videos, their variety of views and different analytics from your channel. you’ll then click any of the individual videos you would like to edit, or click on “video manager” on the left-hand facet.
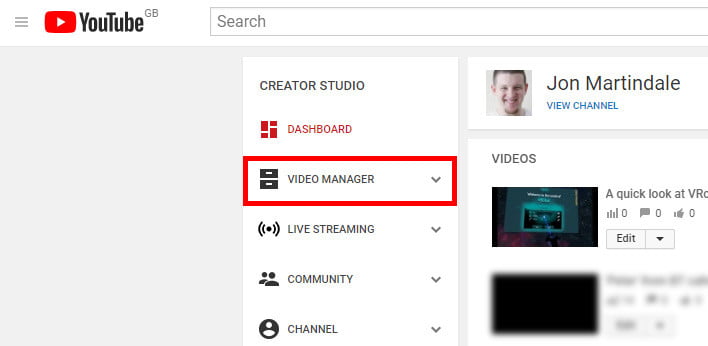
The video manager provides you full access to any tools you may would like, similarly as overviews of every video you’ve uploaded in additional detail.