Sometimes while plug headphone to watch a movie, listen to your favorite music on your computer, you may run into an issue like headphones are not being recognized by Windows 10. Especially after recent windows 10 1903 update users report windows 10 laptop not recognizing headphones, cannot hear anything even though the speaker is working fine.
I’m using Windows 10 on my computer, but can’t get any sound to come out the headphones for the life of me. I plug my headphones into the front 3.5 mm headphone jack, but that does nothing. I know for a fact it is not the headphones, as they work fine on my smartphone.
If you are also struggling from similar issue, “computer not recognizing headphones” don’t worry, here we have solutions help to fix it out.
Headphone not recognized windows 10
Before getting started to the troubleshooting part:
- Check and make sure your headphones are properly connected to your laptop
- Plug your headphone into another port and see if it solves the problem.
- Try your headphone on another device, to check and make sure the device not fulty it self.
- Also, open services console window using services.msc here check and make sure Windows audio and Windows audio endpoint builder service on running state.
If you have installed the Realtek software, open the Realtek HD Audio Manager, and check the “Disable front panel jack detection” option, under connector settings in the right side panel. The headphones and other audio devices work without any problem.
Pro tip:
- Right-click the volume icon on the bottom left of your screen, and select Sounds.
- Click the Playback tab, and Check your device listed there,
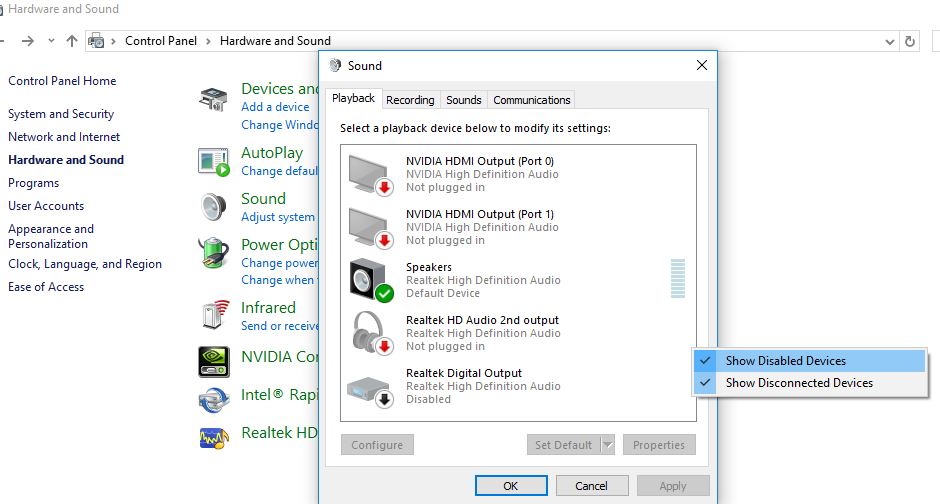
- If your headphones don’t show up as a listed device, right-click on the empty area and make sure Show Disabled Devices has a checkmark on it.
– Advertisement –
Set headphone as a default playback device
Make sure that the headphone that you are using are set as default in the computer.
- Open Control Panel from the Start menu search.
- Select Hardware and Sound then Click Sound.
- Here Under Playback, right-click and select Show Disabled Devices.
- From the list of headphones, right-click on your headphone device name.
- Select Enable, Click Set as Default.
- Finally, click Apply, Reconnect your headphones and check if the issue is resolved.
Run the Playing Audio troubleshooter
Windows has a built-in Playing Audio troubleshooter, that automatically detect and help fix the problems prevent Windows audio sound working properly include the problem of the Computer not recognizing your headphone.
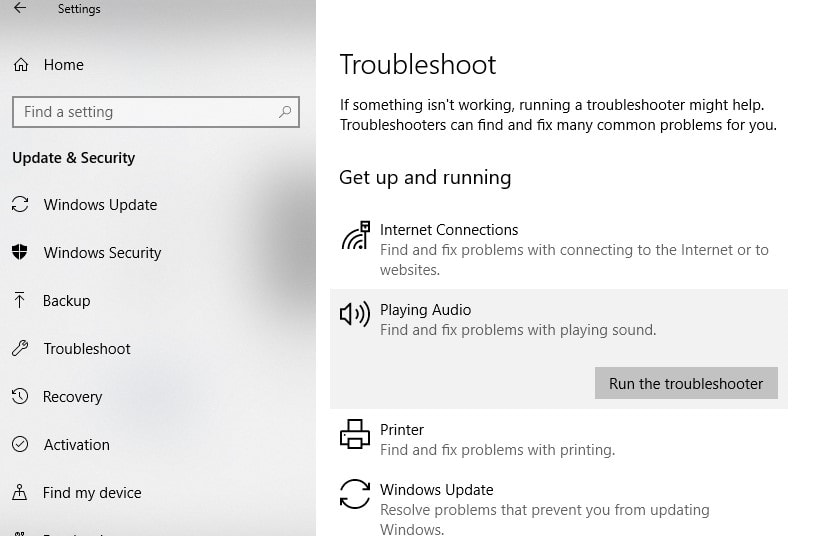
- Open Settings app using keyboard shortcut Windows + I
- Click on Update & security, then troubleshoot,
- Click Playing Audio, and then Run the troubleshooter.
- Click Next. Choose Headphones. Click Next afterward.
- Click No, Do not open Audio Enhancements.
- Click Playtest sounds.
- If you didn’t hear a sound, click I didn’t hear anything.
- This will prompt Windows to reinstall the audio driver.
- Follow the instructions on the screen to continue troubleshooting.
Uninstall and reinstall the Sound drivers
- Press Windows Key + X key and click Device Manager.
- Expand ‘Sound Video and Game Controllers’.
- Right-click on the Sound device listed and click on ‘Uninstall’.
- Select the option to Delete driver software.
- Restart the computer after its uninstalled.
- Now download the drivers the manufacturer website and install it.
Recommended on Dell forum:
- Open the Device Manager using devmgmt.msc in the search box and hit Enter.
- Expand the “Sound, video & game controllers” and right-click on “Realtek High Definition Audio”.
Select “Update Driver Software” option then Click on “Browse my computer for driver software”. - Click “Let me pick from a list of drivers on my computer”.
- Put a check in the box “Show compatible hardware” if not already checked.
- In the list of devices, click “High Definition Audio” (the native driver) and click “Next”.
- On the Update Driver Warning box, click “Yes” (install the driver) and Restart the laptop.
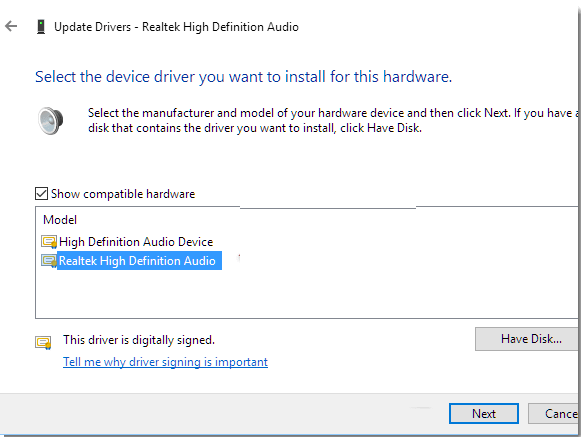
You will now switch to the native audio driver.
Note: Use “generic software device” if “High Definition Audio” isn’t listed.
Change default sound format
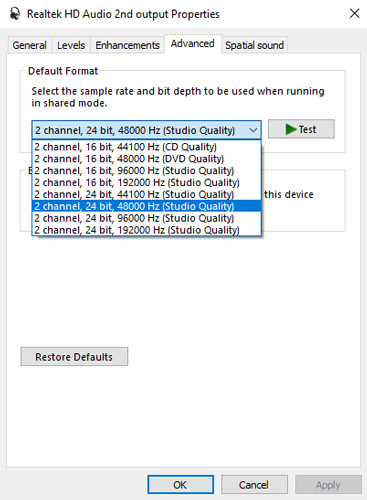
Again sometimes If the default sound format isn’t correct, then you may encounter this Headphone not working issue. Here are quick steps to change the default sound format on your desktop:
- Open Control Panel, Click Hardware and Sound.
- Select Sound, then Go to the Playback tab,
- Double-click on your default playback device.
- You’ll find a thick green mark next to it.
- Switch to the Advanced tab.
- On the drop-down menu, you can change the default sound format here.
- “Test” each time you change it, to see if you start hearing audio.
Another possibility is that the Realtek HD Audio Manager isn’t configured correctly to play sound through your headphones. And Changing the settings may resolve the problem
- Open Realtek HD Audio Manager.
- Click the small folder icon in upper-right corner.
- Tick the box next to Disable front panel jack detection.
- Click OK.
Also read:
– Advertisement –

