On the off chance that you found that your Facebook account was signed in to surprising spots, or simply need to improve your security, how about we round up the different approaches to deal with who can use your account. You can follow these tips for Improve Your Facebook Account Security.
All of these options can be accessed by clicking the dropdown arrow in the top-right and then clicking Settings > Security and login.
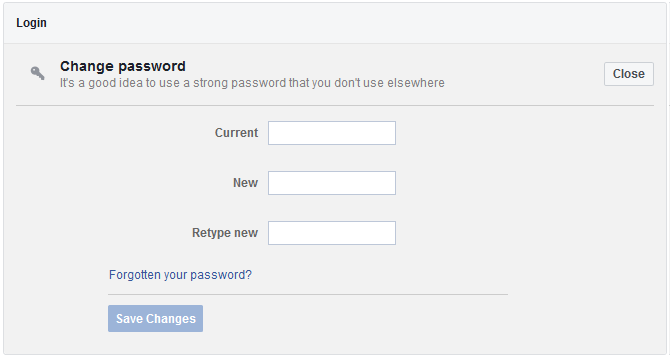
Change Your Password
Changing your password is the first thing you should always do if your account has been accessed without your authorization. In fact, you should change your Facebook password periodically regardless.
Next to Change password, click Edit. You will be prompted for your Current password. Next, input a New password twice, then click Save Changes.
Read More: Facebook messenger feature update
For better security, you should consider using a password manager. These can ensure you have strong passwords and don’t need to remember them either.
Get Alerts About Unrecognized Logins
It’s great that Facebook lets you sign out of unauthorized sessions, but if you don’t check this page then you won’t know if you need to. That’s why you should go to the Get alerts about unrecognized logins section and click Edit.
Here you can set to Get notifications so you’ll be informed when someone logs into your account from an unrecognized device or browser. Select your preferences and then click Save Changes.
you may also know : How to permanently delete your Facebook account
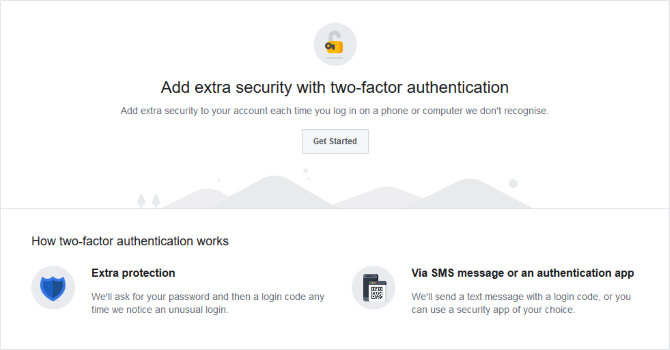
Use Two-Factor Authentication
Two-factor authentication is an extra layer of security when logging in to your account. It requires you to input not only a password, but also a secondary piece of information that only the real account owner can access.
To activate it, next to Use two-factor authentication, click Edit. On the next page, click Get Started. Choose whether you want to use a Text Message or Authentication App as your extra security, then click Next and follow the wizard. These two options are all Facebook offers at the moment, and it’s important to note that SMS and 2FA apps aren’t all that secure.
You’ll only need to use two-factor authentication when Facebook doesn’t recognize the device. You can review and adjust this approved device list. Go back to the Security and login page and, next to Authorized logins, click View.
While you’re at it, check out our guide on how to set up two-factor authentication for all your social media accounts.
How to increase your Facebook privacy settings
Step 1: Sign into your account
Learn about : How to See Other Devices Logged Into Your Facebook Account
Go to www.facebook.com/settings and sign into your account, if prompted.
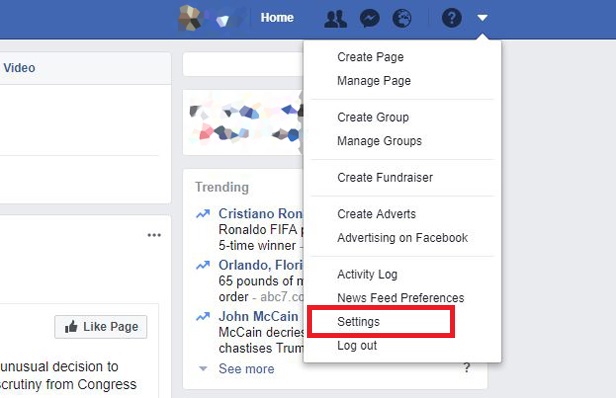
Click the downward arrow on the far right and scroll down to Settings.
Step 2: Open the privacy settings
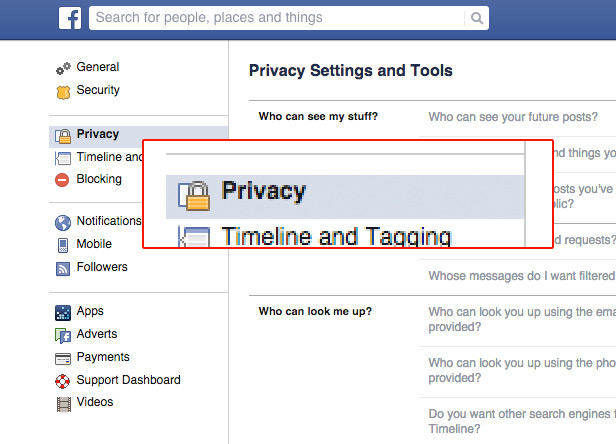
Look down the left of the page and click the Privacy option.
Step 3: Control who sees your posts
To avoid posting things to your timeline you don’t want certain people to see, head to the Your activity Section, click Edit next to Who can see your future posts?
The top box shows your current selection, to change this, click the drop-down arrow and Only Me. All new timeline posts will now be private by default, but you can change who sees them on a post-by-post basis on the timeline itself.
Read more How to Save and Find Saved Videos on Facebook
Step 4: Stop your profile from being searched
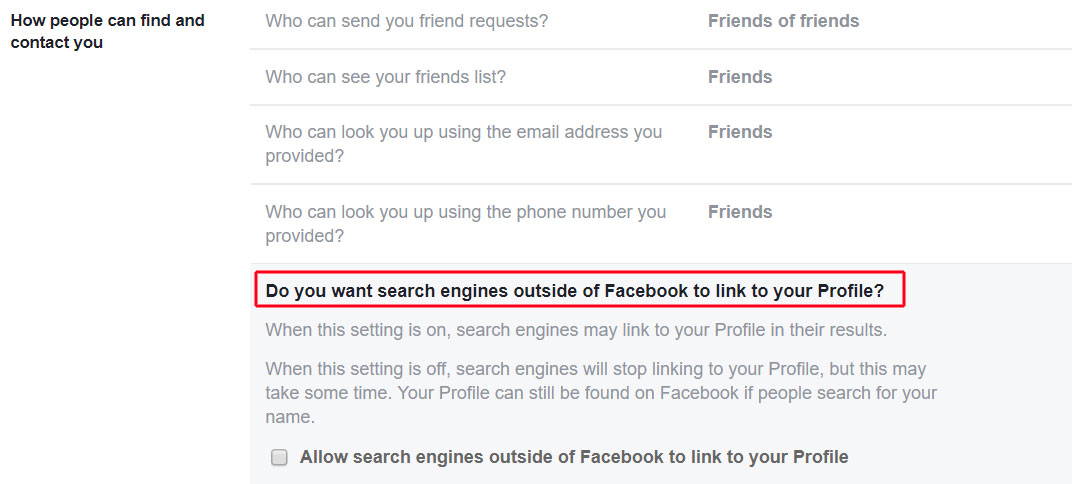
Click Privacy again and this time look under the How people can find and contact you? Section.
Here you can check who you want to be able to find you on Facebook using your email address or phone number (if you provided one). Choosing Friends for both is the most private option.
Whatever you choose, it’s definitely worth checking the Do you want search engines outside of Facebook to link to your Profile? option to No by deselecting the tick box to prevent anything you post appearing if someone searches for your name on Google or another search site.
Step 5: Keep certain posts that mention you off your timeline
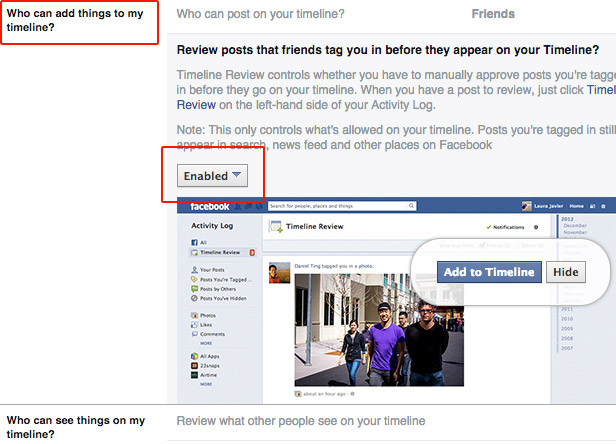
Click the Timeline and Tagging option on the left of the page. Setting the Review posts that friends tag you in before they appear on your Timeline? option to On means you must approve posts by your friends that mention you before they can appear on your timeline.
This means you can prevent your entire timeline seeing a photo of you in one of your friends’ posts, for example – mutual friends would see your picture, however.
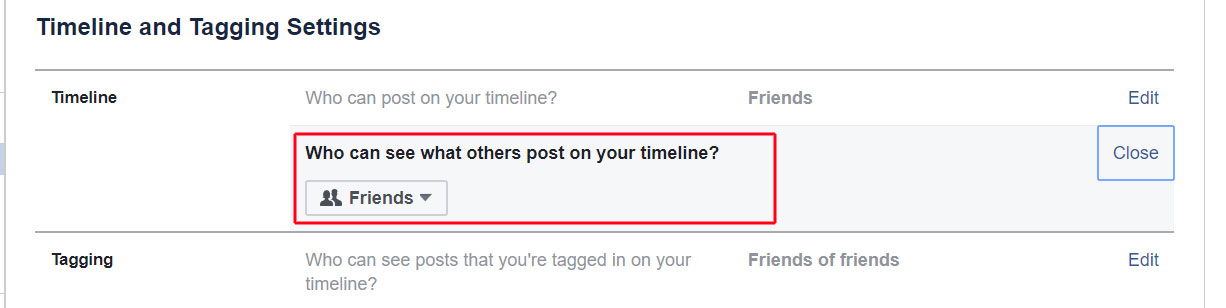
Step 6: Lock your timeline
Remain with the Timeline and Tagging Settings, where Who can see posts you’ve been tagged in on your timeline? and Who can see what others post on your timeline? give you fine control over who sees what.
If you organised your Facebook friends into groups, you can prevent colleagues from seeing posts on your timeline intended for your family, for example.