Probably one of the most common questions someone coming to your home for the first time asks is – “What’s your Wi-Fi password?” In most cases we give our wireless password to everyone coming at our place but it would be much better to have a separate Guest Wi-Fi network for all of them. By doing this we won’t have to share our primary Wi-Fi password and we will protect our main home network from unauthorized access. After all, our guests need a working internet connection and that’s what we are going to give them
Why Should You Set up a Guest Wi-Fi Network?
There are several good reasons why having a Guest Wi-Fi network is a good idea. Let’s take a quick look at the main reasons.
Our password is often too complicated
Perhaps your main home Wi-Fi password is too complicated. So instead of dictating the Wi-Fi password over and over again or typing it for your guests, it is much easier to protect the Guest network with a simple password. At the same time, you can easily change that password from time to time. Also, of you do this, you won’t have to update the password on all the devices connected to your main network.
Our guests need internet connection and nothing more
The guest network will allow our guests to surf the internet and do what they normally do online, but they won’t have access to your main wireless network and personal files.
It protects our main home network
If the device your guest uses is already infected with malware it won’t affect the main home network and the devices connected to it. It basically represents an extra layer of security.
How to Manually Create a Guest Network
Before you begin creating your Guest Wi-Fi network it is vital to check whether your wireless router supports creating them. You can check this either on the manufacturer’s website or the user’s manual, or you can login to your router and look for Guest Network in the settings. Whatever you choose you will have to access the router settings, so let’s see what we have to do to set up our own Guest Wi-Fi network.
In next steps we are going through the settings of an ASUS RT-AX88U wireless router but the steps are quite similar in routers made by other manufacturers as well.
1. Login to your Wi-Fi router
To access your router settings, you need to know its default IP address and the default username and password (if you haven’t changed them before).
You type the default IP in the web browser’s Address bar and after you press Enter on your keyboard you will be asked to enter a username and password. Our Asus router normally uses 192.168.1.1 as a default IP, and “admin” as both username and a password. You can easily find these login details in the user’s manual or printed on a label on the router. There are also many step-by-step guides published on RouterCTRL on how to login to your router, so you might check it as well.
2. Enable Guest Network
When you access the router settings, find and click on Guest Network and you will have to enable the Guest Network first. You can choose whether you want to enable a 2.4GHz or 5GHz one. Please note that in some routers produced by other manufacturers you need to look for it in the Advanced settings.
3. Let’s go through the settings
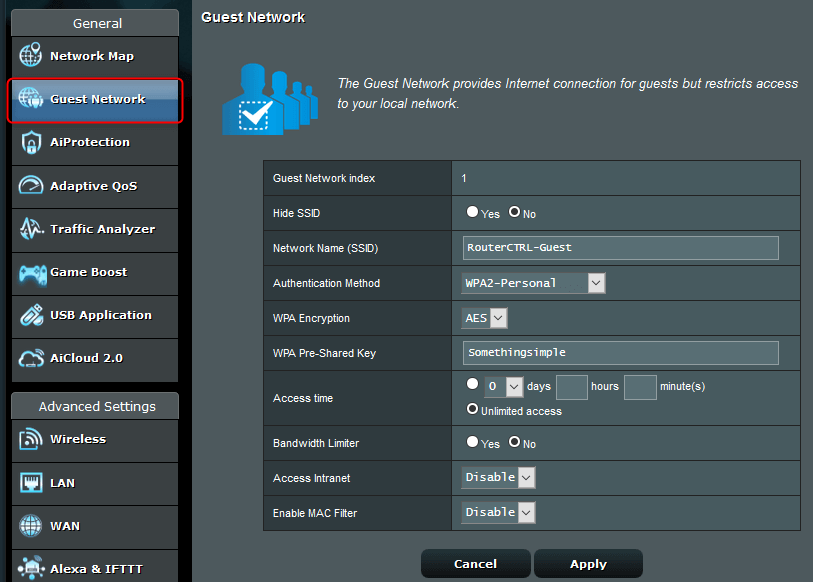
When you enable the Guest Network you will gave to go through the settings so let’s see what you have to do here.
Hide SSID – There is no need to enable this option so make sure to leave it to “No”. Hiding the SSID (Network name) will only make us troubles since our guest won’t see our guest network.
Network Name (SSID) – You can change the Guest network name or leave the default one. In both cases it needs to be different than the primary network name.
Authentication Method – Here we recommend choosing WPA2-Personal and for WPA Encryption choose AES.
WPA Pre-Shared Key – Here you should setup a secure password, but make sure to keep it simple and memorable, but jet not too easy for your neighbors to guess it.
Access time – This option is used when you want to make the guest network available for a limited time or always.
Bandwidth Limiter – As the name suggests, you can use this option to limit the upload or download speeds.
Access Intranet – This option lets you decide whether your guest can access your local network or not. We recommend keeping this disabled.
Enable MAC Filter – With this option enabled only selected devices (by their MAC address) can r can’t use your guest network. For now, it is best to keep it disabled.
Now you can click Apply to save the settings and the guest network will be fully functional in a few minutes.
To Sum Things Up
Creating the Guest Wi-Fi Network on different routers and networks will be a little different because their admin console interface is different, but the concept is pretty much the same. The main idea is to give your guests what they want and that is an internet connection. There is no need to let them mess with your personal network. As you can see, the steps required to create your own Guest Wi-Fi network are quite simple, so you have nothing to wait now. Get ready for your guests.