After accidentally reverting a patch for a security exploit that led to an iOS 12.4 jailbreak, Apple released iOS 12.4.1 to fix the issue. What this means is that the clock has started ticking and it is only a matter of time before Apple stops signing iOS 12.4. If you want to jailbreak your iPhone or iPad, you should consider upgrading/downgrading it to iOS 12.4 in case you have accidentally installed the iOS 12.4.1 or are currently running an iOS 13 beta build.
Apple will likely stop signing iOS 12.4 within the next 24-48 hours so you should consider going back to it on your iPhone or iPad as soon as possible. This is even applicable for iPhone XS, iPhone XR or other A12/X Bionic device owners as a possible iOS 12.4 jailbreak for them seems to be around the corner.
Downgrade to iOS 12.4 to Jailbreak Your iPhone or iPad
Method 1
The riskier method of the two but you can downgrade your iPhone or iPad back to iOS 12.4 with this process without wiping your device clean. This makes it notably faster than the second method which involves erasing all data from your device.
How to Downgrade iOS 12.4.1 to iOS 12.4 Without Losing Data
- Turn off Find my iPhone via the Settings app (Settings > iCloud > Find my iPhone).
- Download the iOS 12.4 firmware file for your device from our iOS firmware file download page for your iPhone or iPad.
Note: If you’re downloading the firmware file using Safari then ensure that auto unzip feature is disabled or use Chrome or Firefox. Alternatively, renaming the .zip file as .ipsw file should also work.
- Connect the iOS device running iOS 12.4.1 to your computer.
- Launch iTunes and select the iOS device from the top left corner.
- Then click on Summary in the left-hand sidebar.
- Hold the Alt/Option key on the Mac or Shift Key in Windows on your keyboard and click on the Check for Update option, instead of restoring.
- Select the iOS 12.4 ipsw firmware file you had downloaded earlier.
- iTunes will inform that it will update your iOS device to iOS 12.4 and will verify the update with Apple.
- Click Update.
- iTunes should now downgrade your iOS device to iOS 12.4.
Method 2
A safer method but it takes more time since you will have to erase your iPhone completely. You will also have to ensure that you already have an iOS 12.4 backup since you cannot restore your iOS 12.4.1 backup on your iPhone or iPad after the downgrade. If you don’t have an older backup, you won’t be able to restore your iPhone after downgrading it back to iOS 12.4.
How to Downgrade from iOS 12.4.1 to iOS 12.4
- Download the iOS 12.4 firmware file for your device from our firmware download page.
- You now need to put your device in DFU mode (if you want to find out what it means check this post for more details):
- Plug your device into your computer.
- Turn off the device by holding the Sleep/Wake or Power button and swiping it off.
- Hold the power button for 3 seconds.
- Begin holding the Home button without releasing the Sleep/Power button for 10 seconds.
- Release the power button and continue holding the home button until you get a popup from iTunes that it has detected that your device is in Recovery mode.
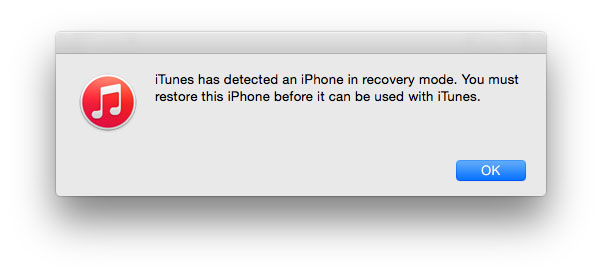
- Click on the Ok button.
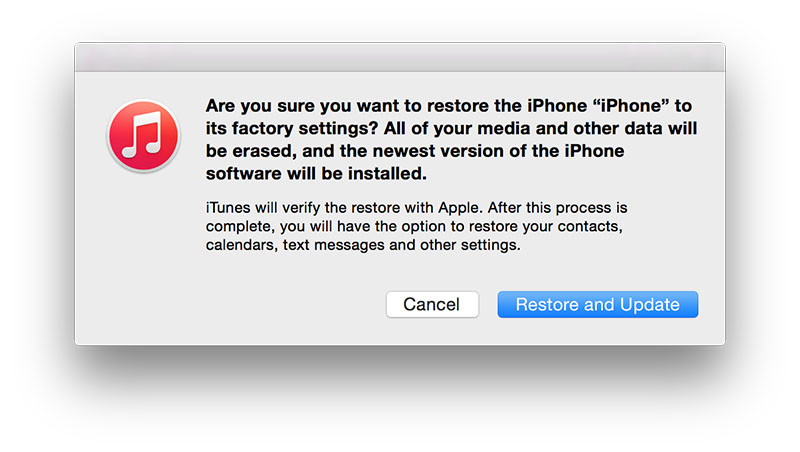
- Hold the Alt/Option key on the Mac or Shift key in Windows on your keyboard and click on the Restore iPhone… (iPad/iPod touch…) button. Note: If you directly click on the Restore iPhone button without holding the Alt/Option key on the Mac or Shift key in Windows will result in restoring your device back to iOS 12.4, which is the latest version.
- Select the iOS 12.4 IPSW file you had downloaded earlier.
- Then click on the Restore and Update button to continue.
- In the next screen, it will give you information about the iOS 12.4 update. Click on the Next button, followed by the Agree button to continue.
- iTunes will now verify the software and install it on your device. It should take around 10 minutes.
- After it is successfully restored to iOS 12.4, you should see the white ‘Hello’ screen. Follow the on-screen instructions to set up your device, and restore your device from the archived backup you had made to restore your personal data.
That’s it. Your iPhone or iPad should have been successfully downgraded from iOS 12.4.1 to iOS 12.4.
Once you are done downgrading your iPhone or iPad back to iOS 12.4, you can follow our guide on how to jailbreak it using Unc0ver. After that, check out some of the best Cydia tweaks and sources to make the most of your jailbroken iPhone.